My client and I were able to build 1,120 quality backlinks pointing to 700+ of his website pages with a single line of code in less than 1 hour.
How? We found and decided to reclaim 404, dead or otherwise broken links that were already pointing to his site. We used a regex expression to redirect nearly every single broken link to the correct, existing page on his site.
Doing this type of work is the best form of “low hanging fruit” in search engine optimization for a few reasons –
- You are making the most of work you’ve already done.
- Unlike other work (like content promotion) – you control the implementation.
- Your work has side benefits like better user experience in addition to better search rank from the links.
But the process can be counter-intuitive and hard to get right, especially with the regex expression and redirects.
Here’s the steps we went through to get all these inbound links pointed in the right direction.
Step 1. Identify Inbound Links to Broken, Dead or 404 Pages
Remember, you are looking for links pointing to broken pages on your site. This plan is the inverse of more typical broken link building that I’ve covered both here and here.
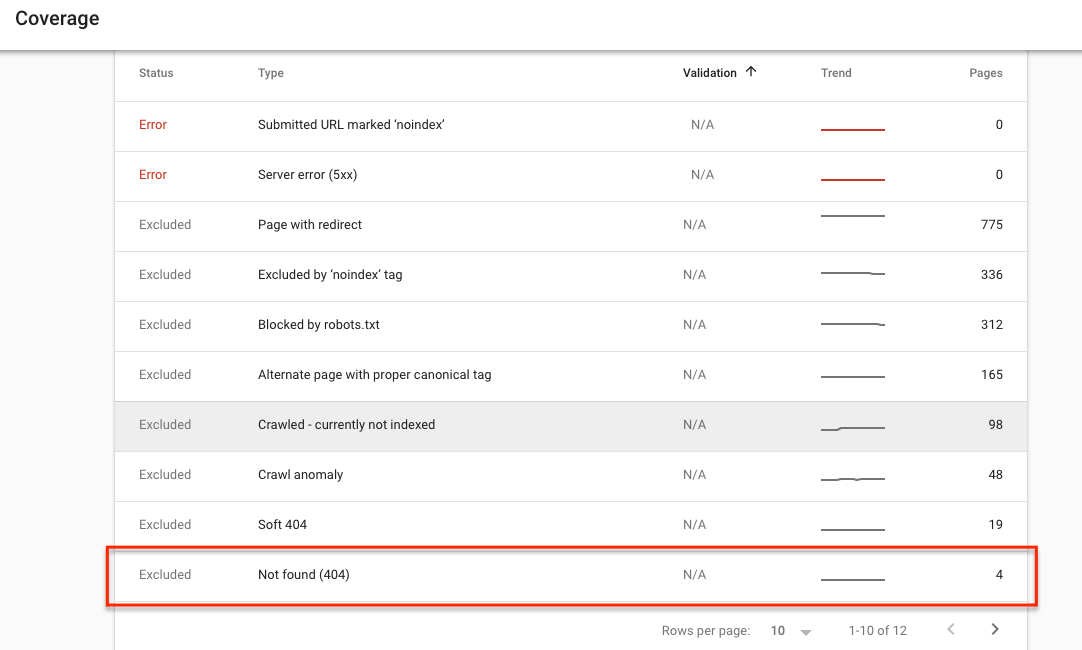
If you don’t have a paid tool (get a free trial of SEMrush or Mangools), you can use your Google Search Console Coverage report.
Navigate to the Coverage report under the Crawl section in Google Search Console.
This report shows where Googlebot has encountered a 404 code during its crawl. It’s often from bad internal links.
Aside – you should fix your internal links as well.
But you’ll also find links from external sites. Click on the crawl error and looked at the “Linked From” section.
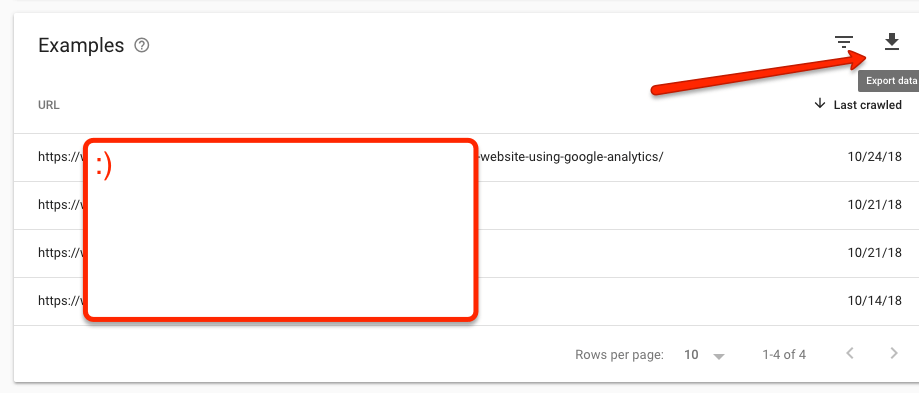
If you are focused on broken external links, you can also export your top linked pages report and drop them in a URL status checker.

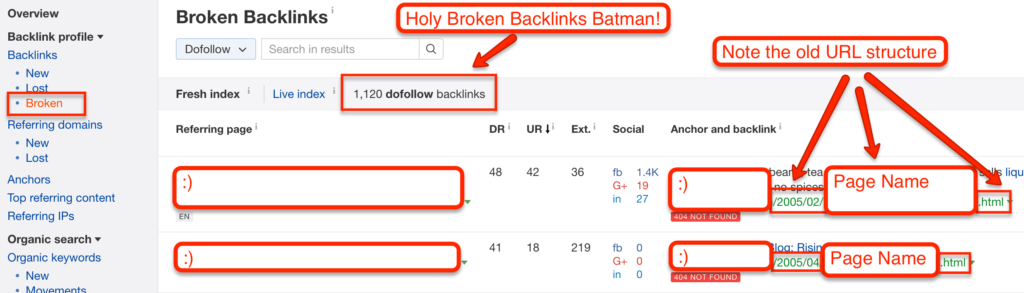
You’re also looking for a URL pattern that will allow you to redirect lots of links quickly. In my client’s case, he had migrated CMS’ years ago that changed his blog’s URL pattern from – /year/month/post-name.html to /post-name/
Aside – if you don’t have a URL pattern, you should still fix the links…you’ll just need to budget more time to manually redirect each URL with .htaccess and/or the WordPress Redirection plugin. But be careful if you are editing the .htaccess file.
My client was using WP Engine and was able to test links before pushing changes live. If you are using a Website Builder, be aware that you may be able to hack a solution, but this is one situation where WordPress does better than builders like Wix or Squarespace.
If you have a paid tool like SEMRush or LinkMiner by Mangools, then you’ll get much better, clearer data than Search Console will provide.
I wrote a giant guide to do this with Ahrefs, but you can also use other backlink tools like SEMRush or LinkMiner.
Load your site in Site Explorer and navigate to Broken Inbound Links.
Again – you’re looking for a URL pattern…or prepping for a lot of manual work.
Step 2. Break Down Your Redirect Pattern
The URL pattern that we identified was as follows.
- Old URL Pattern – [domain]/year/month/post-name.html
- New URL Pattern – [domain]/post-name/
We needed to write a redirect that would tell Googlebot (and any browser) that –
“Hey! That post that was at /year/month/post-name.html is now permanently at /post-name/”
In web jargon – this instruction is called a 301 Redirect.
For user experience and general web best practices, we wanted to have a single redirect. We did not want to redirect the dates and then redirect the .html – we wanted to do everything all at once.
Step 3. Write Your Redirect with Regex
Regex is short for “regular expression” – it’s like a shorthand for computers. It allows software to pattern match rather than explicitly telling the software what to do with every single instance.
Most marketers come across Regex when using Google Analytics.
In fact, LunaMetrics’ Guide to Regex in Google Analytics is a helpful resource for writing an Regex.
Now, changing dates in permalinks is a fairly common problem for WordPress users.
To shortcut some of the Regex writing, I used Yoast’s Permalink Helper (the same guy who created the Yoast SEO plugin). It’ll give a starting Regex to work with.
Here’s the code it gave initially –
[code]RedirectMatch 301 ^/([0-9]{4})/([0-9]{2})/(?!page/)(.+)$ http://www.mydomain.com/$3[/code]
That’s great and all – but remember that I wanted a single redirect for everything, including the .html
To fix that I amended the redirect to –
[code]RedirectMatch 301 ^/([0-9]{4})/([0-9]{2})/(?!page/)(.+)\.html$ http://www.mydomain.com/$3[/code]
Before you go and blindly copy the code – take a second to understand what is going on.
[code]RedirectMatch 301[/code]
This tells anyone accessing your server to permanently redirect the following pattern.
[code]^/([0-9]{4})/([0-9]{2})/(?!page/)(.+)\.html$[/code]
The source URL pattern should be URLs on the domain that –
- start with the domain
- followed with 4 numbers
- followed with a slash
- followed with 2 numbers
- followed with a slash
- followed with the page variable from WordPress
- ending with .html – note the \ that “escapes” the period
The target URL pattern is –
[code]http://www.mydomain.com/$3/[/code]
The target URL pattern simply says to go to the domain; followed by the 3rd variable in the source URL (i.e., whatever !page is). The variable should start and end with a slash.
Step 4. Implement & Test Your Redirect
To implement the code, you can simply add the code to your .htaccess file through FTP connection to your server.
Warning – the .htaccess governs access to your website. If you get the code slightly wrong, you could crash your site.
If you use WordPress, you can use the Redirection plugin or use the RankMath SEO plugin, which has Redirections built-in.
You still need to have your code right, but it is a bit more user friendly.
Break your redirect down into “Source” and “Target” and check the Regex box.
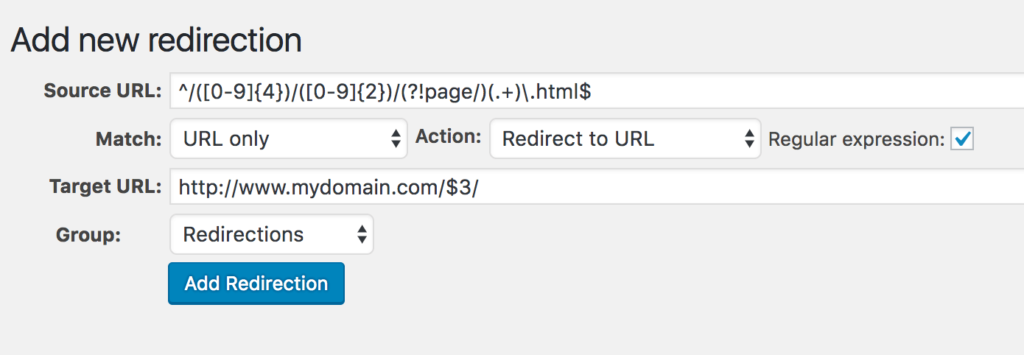
Then click Add Redirection – and you are done!
Your Next and final step is to test your redirects.
Take a few of the old URLs and drop them into a crawler tool like Screaming Frog or a web app like HTTPstatus.io.
You should also load an incognito browser and manually test a few.
Once your tests go well, and you see a successful single redirect – congratulations you’ve reclaimed your broken backlinks.
Aside – you can (and should) do this process for broken internal links if it is not feasible to fix internal links manually. Ideally, your internal links would not go through any redirects. But that is not always feasible. A redirect is better than a 404 though.
Next Steps
Go to your Search Console report and/or your SEMrush broken links guide or Mangools LinkMiner – identify broken inbound links and reclaim them!