This guide covers exactly how to set up a WordPress ecommerce website with the WooCommerce plugin.
The WordPress platform originally began as a way to blog online. Over the years, it has evolved into a full blown “content management system” – in other words, a backend software that can “power” any type of website – including an eCommerce website.
That said, WordPress as an eCommerce platform isn’t a good fit for everyone. Here’s a brief rundown of reasons it would be a good fit:
- You want full control over your website
- You want to easily build out other portions of your site that aren’t ecommerce (blog, pages, etc)
- You don’t want the monthly & transaction fees of an integrated eCommerce platform like Shopify
- You want to start small and build out your site as you grow (ie, and avoid the fees while doing so)
- You aren’t daunted by some technical work – ie, hearing the acronym “FTP” makes you more curious than scared (note – WordPress is built to be easy for first timers, but it’s not a click, click, done software either)
- You don’t plan on having a complicated payment processing system at first (ie, you’ll be using PayPal, Amazon or Google Wallet, not processing payments on your own server). WooCommerce works perfectly fine on SSL, but again, you’ll need that expertise to implement it properly
- You want a common platform where you can easily pull developers in on a project basis as you grow
WordPress will not be a good fit for you if:
- You want all the hosting and technical details simply taken care of (especially speed, etc)
- You are plan on having a full (ie, non-PayPal) integrated payments/inventory system right from the start without developer help (ie, you’ll be selling across platforms like eBay/Etsy and need inventory numbers to be automatically updated – WooCommerce can do this, but it can be complicated)
- You want dedicated customer support that’s already paid for
- You want a single bundled predictable cost of software every month – rather than a potential developer bill
If WordPress doesn’t look like a good fit, you should check out Shopify (see their plans).
Note – I wrote a quiz to help choose the best eCommerce platform for your needs and wrote a WooCommerce Review.
Otherwise let’s dive into the guide.
Getting Started – Installing WordPress
Your absolute first step for using WordPress for an eCommerce website is to actually install WordPress on a hosting account with your domain name. Here’s my guide to setting up WordPress step by step on a hosting account if you don’t have it already.
Ecommerce sites need even more memory for PHP than a standard WordPress install since they are larger and more complex than a simple blog. Having thousands of products + thousands of visitors can add even more resource requirements to your hosting account.
If you’re starting out small (hundreds of products, low thousands of visitors), a shared linux hosting account (like the one I mentioned in the setup guide) is good, but it needs to have more than 64M of memory…preferably 256M.
I recommend InMotion Hosting (see their plans) with HostGator (see their plans), and SiteGround (see their plans), also being good options.
If you’re starting out big (thousands of products, many thousands of visitors), you’re going to need either a managed WordPress hosting account from a company like WP Engine (see their plans) or Liquid Web (see their plans) or a VPS hosting account from InMotion.
Intro to WordPress eCommerce Options
There are really 3 components that make a “regular” website an “eCommerce” website – product pages, shopping cart, and a checkout process.
You can add the eCommerce functionality to WordPress with a plugin. Plugins are separate pieces of software that you install and activate into WordPress that basically adds to what it can do.
In this case, we need a plugin that will create custom product pages, that will have a shopping cart functionality allowing individual visitors to add products to a cart throughout the time they are on the site, and that will sync up with a payments system to accept payments and match those payments up with the visitors’ products purchased. Wow.
There are a lot of plugin options to turn your WordPress site into an ecommerce site, but by far and away the leader is WooCommerce by Automattic (the people behind WordPress.com and JetPack).
It has the functionality, the ease of use, the reputation, community, and versatility to be a solid long term choice for an ecommerce plugin.
It’s the most search engine optimization-friendly ecommerce platform I’ve seen. I’m an SEO Specialist who’s worked on major brands’ platforms, and from an SEO perspective, I would love to be able to work with WooCommerce. It gets rid of most all duplicate content (a SEO plague for online stores) and has Schema markup built-in.
Plus, the company that creates it, WooThemes, has been a core part of the WordPress community for years. In fact, Woocommerce has been acquired by the same company that owns WordPress.com and supports the WordPress.org foundation. Since they’ve open-sourced the software…it’s not going away anytime soon.
It has support and plenty of versatility for what you’ll need.
Oh – and it’s free.
Here’s WooTheme’s sales pitch & overview.
Quick aside – Anytime something is free, you should look for the catch. In this case, WooThemes makes money providing extensions to WooCommerce for things like advanced inventory management, direct credit card processing (ie, the free version syncs with PayPal, but not directly with your credit card processor). WooThemes also sells custom themes, which are encouraged but not required.
While there are solid alternatives like MarketPress out there, if you’re going to go WordPress for your online store – I recommend using WooCommerce for its strong developer base, app store and compatibility with a range of plugins & themes. It’s what this tutorial will focus on.
WooCommerce has a ton of options and tons of documentation. Here’s how I generally install it for clients with a focus on things that often trip up first-timers. It may look daunting, but it’s really straightforward once you get a handle on the general structure.
Install Your Ecommerce Plugin
To get started with WooCommerce, navigate to your WordPress Dashboard and Add New Plugin. Search for WooCommerce, and simply install and activate WooCommerce by WooThemes.
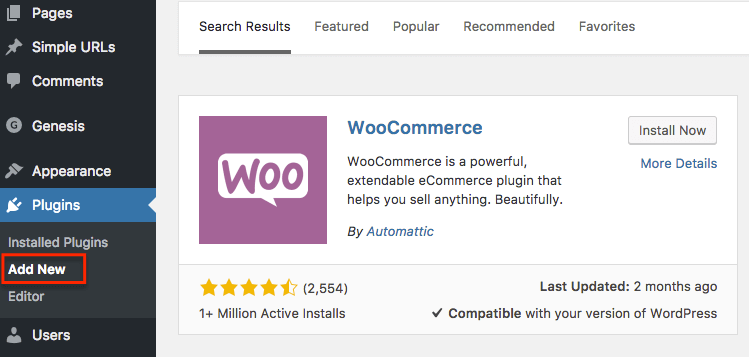
After activating your plugin, you’ll be prompted to Install WooCommerce with a wizard to take care of the initial settings. It’s worth it.
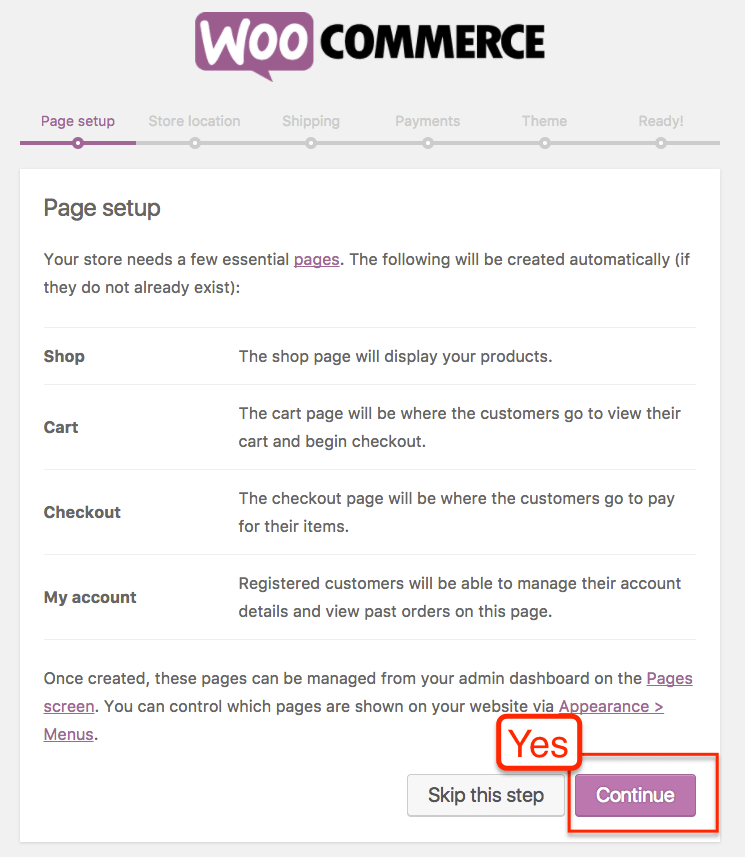
WooCommerce needs several pages to function – including a Cart page, etc. There is one page, the Shop page, that you may want to customize. But for now, you can let the wizard install these pages.
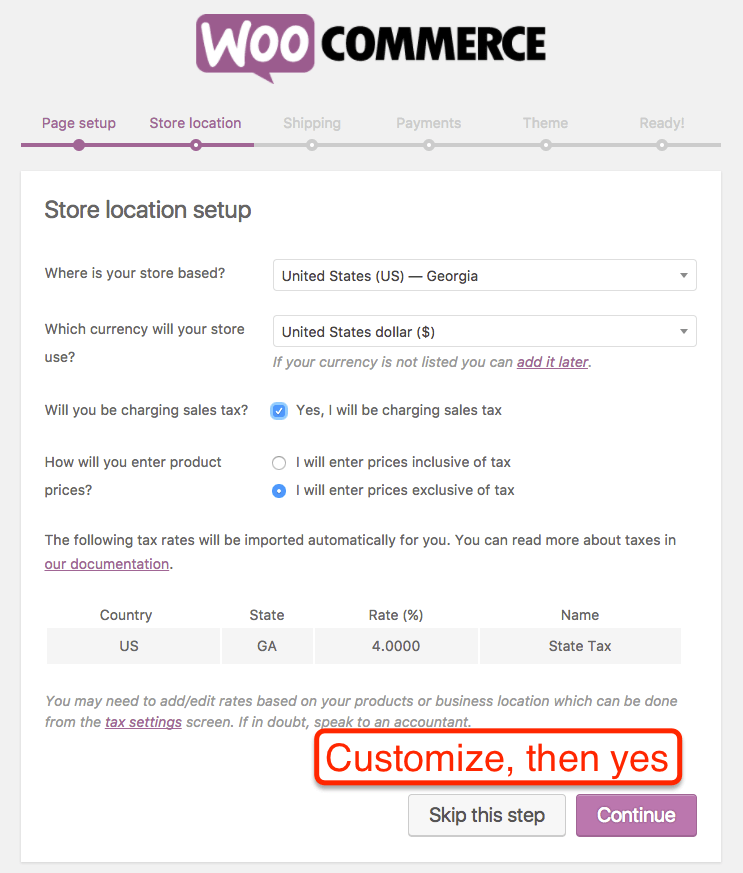
You’ll then need to set your location, units and currency. Be sure to note your tax rates. You can edit and change them later.
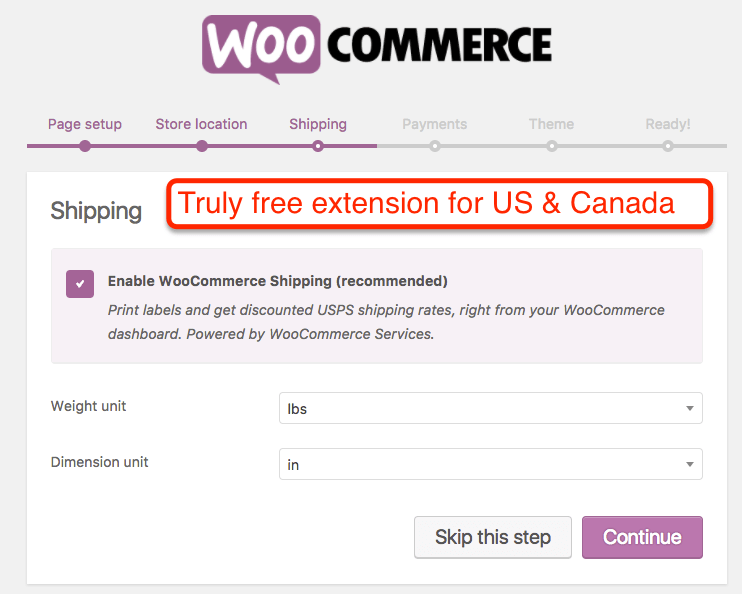
And now for Shipping & Tax. You can (and will) need to change/customize this later in the Settings. But for now, you can enter in general settings to get the store started.
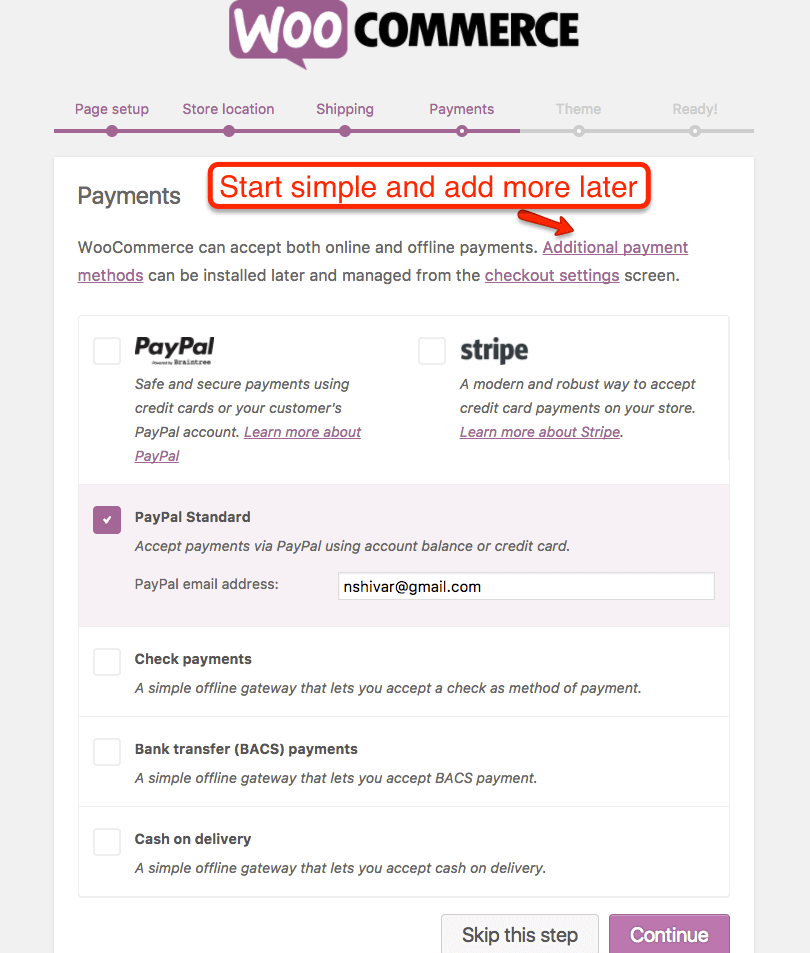
Then you’ll need to enter Payments. Payments are the trickiest part of running your own store. I recommend entering PayPal so that you have something to start. You can explore other options in the settings as needed.
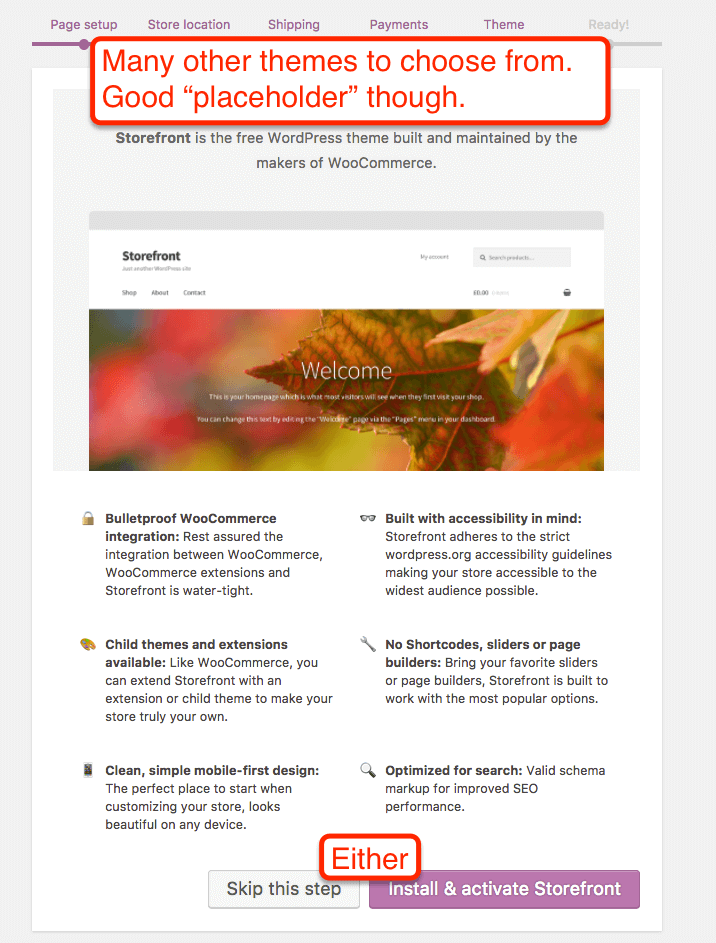
Next you’ll need to set your theme (ie, your design / layout). WooCommerce has a lot of unique design classes that have to be covered. I recommend using the default Storefront theme as your placeholder while you set up your products and shop for new theme. I’ll cover it in coming sections.
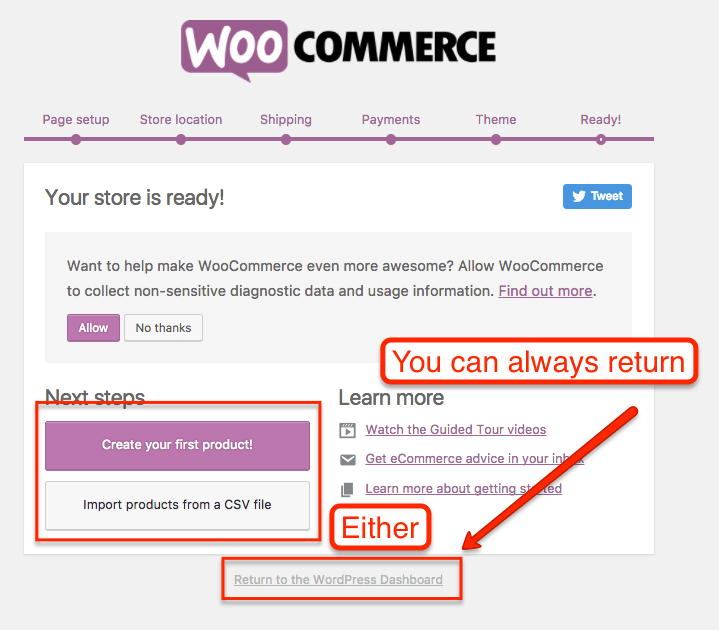
Now that WooCommerce is installed – you can go learn more about the product, head to a New Product page or return to WordPress Dashboard. I recommend heading to the Create Your First Product page so that you can go through the walkthrough and check out the information you’ll need to enter.
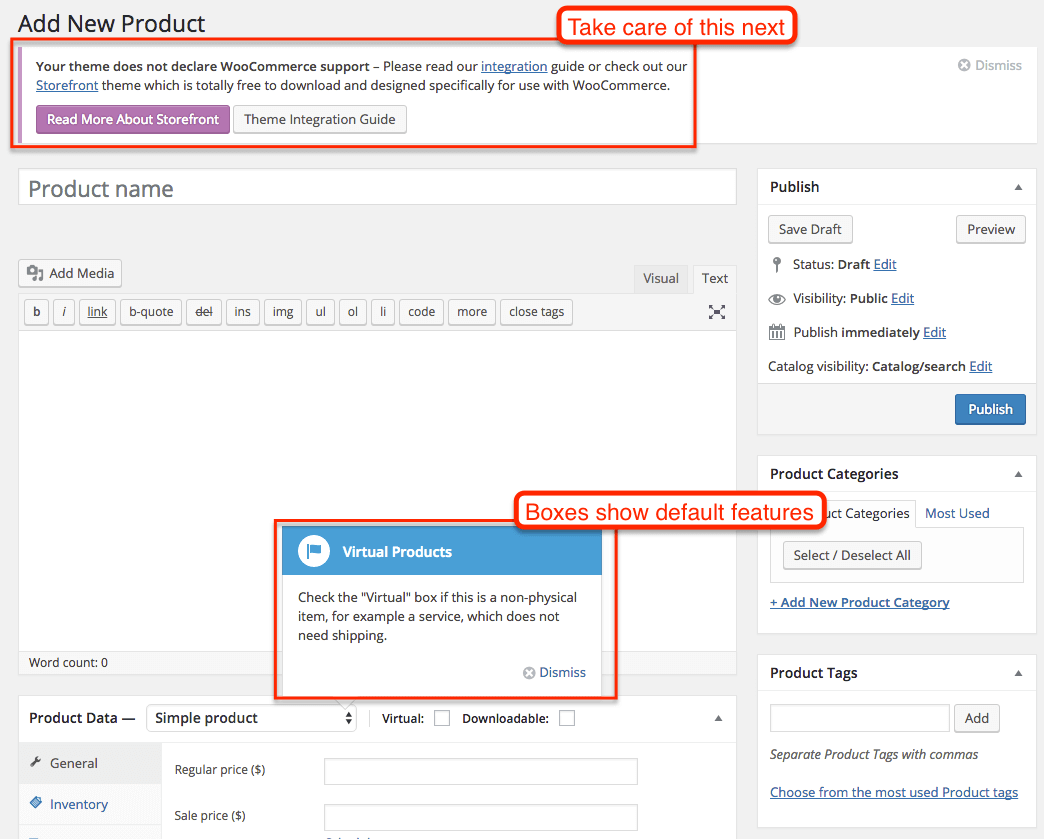
If you click on “create your first product” – you’ll be sent to a new product page. I recommend explore the Product page to see what you need – but don’t actually add any new products (except for a test product to see how your design / theme looks). Your next step will be to make sure your store URL structure is correct and your WordPress Theme integrates with your new ecommerce functionality. Otherwise, you’ll create a mess for yourself later.
Aside – in addition to theme compatibility, keep in mind that there are many 3rd party plugins that will sync up with WooCommerce. Make a note to set up those options. For example – consider Analytics.
To call the ecommerce analytics available in Google Analytics powerfully useful would be quite an understatement. But you can’t take advantage of it unless your site’s analytics tracking is setup correctly.
You should be using the Google Analytics by MonsterInsights (formerly by Yoast) for your Google Analytics integration, but we want to go a step further and markup your online store with lots of specialized ecommerce tracking (like passing SKUs, and item attributes seamlessly into Analytics).
To do that, head back over to Add New plugins and search for WooCommerce Google Analytics Integration. It too is produced by WooThemes, and is free. Install and activate. Boom – you’ve just added tracking that agencies normally sell for $$$$. You can do this same process for Yoast SEO and many other plugins.

Now that you have WooCommerce installed, let’s move to the site structure before moving to General Settings.
Setup Your Online Store Structure
One huge benefit of WordPress + WooCommerce is efficient setup of permalinks ie, “permanent links.” Online stores often have a thousand ways plus one to display products. It can generate really inefficient, ugly, and search engine unfriendly URLs for your products and product categories.
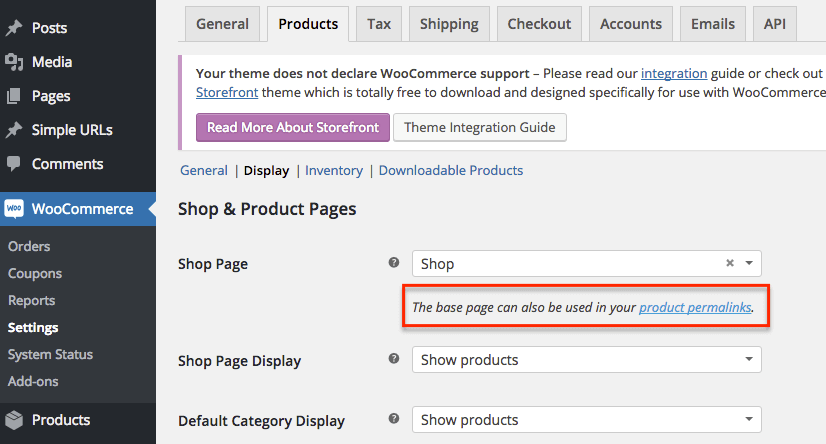
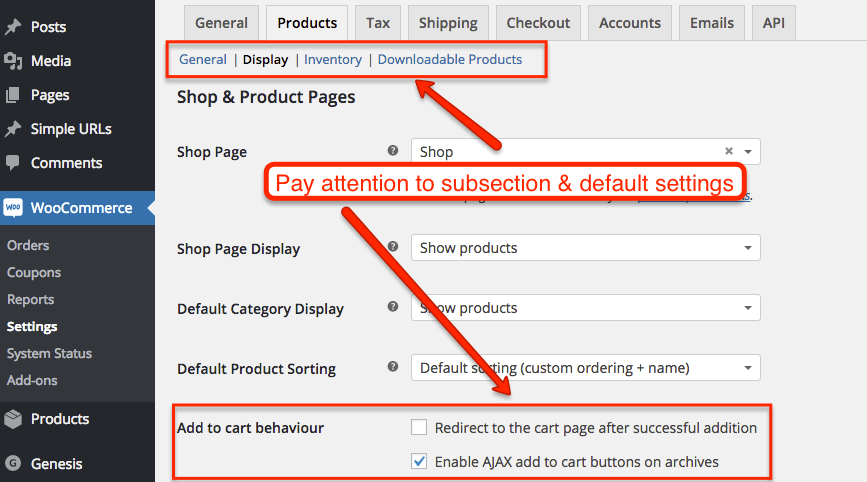
Once you set up a permalink structure, it’s difficult to change. Even though the defaults are generally best, I like to confirm them before moving to General settings or anything design related. To start, go to the new WooCommerce link on your Dashboard –> WooCommerce –> Settings –> Products.
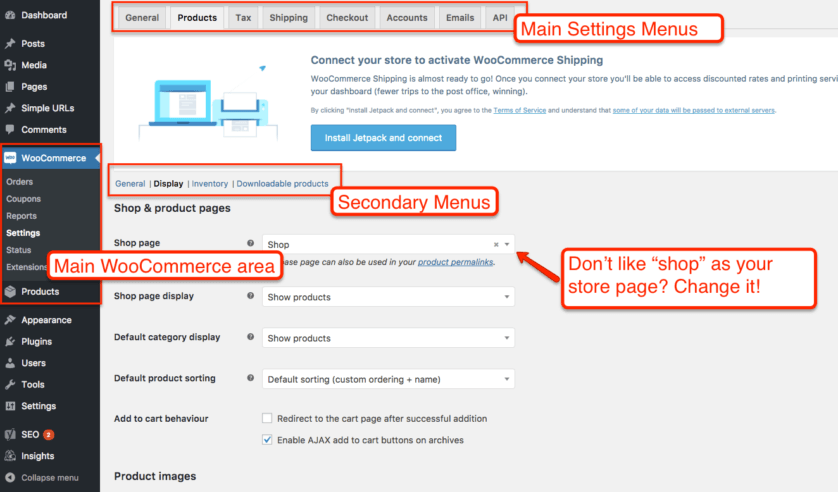
WooCommerce needs a product archive page that’s going to display all your products and/or categories. Think of it like your Blog page that displays all your recent posts…but with your products.
WooCommerce uses a standard WordPress page for this archive. By default, it’s the Shop page. You can edit that name in Pages –> All Pages. You can create a new page. You can call it whatever (ie, ‘Store’). You can leave it default.
Your visitors don’t have to see it, or you can go to the main Settings –> Reading and make it your Homepage. But it has to exist, and this is where you go to customize it.
After confirming that page, click the link to look at your Product Permalinks.
This page allows you to set your WordPress permalinks and your product permalinks. When initially setting up WordPress, you should have enabled Pretty Permalinks (see how here).
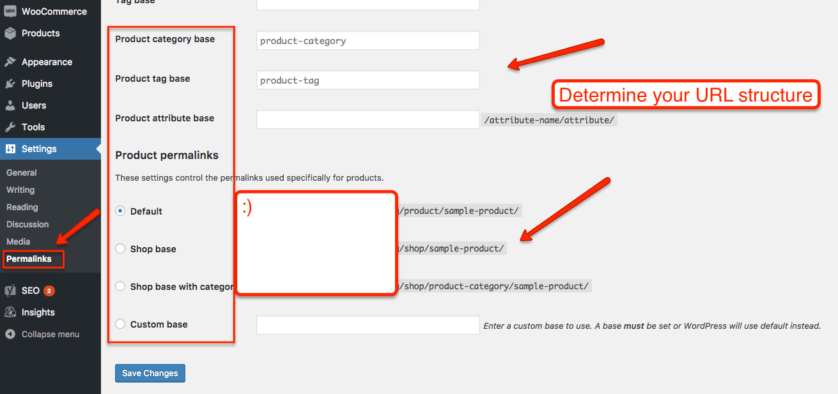
These permalinks are structured so they never conflict with blog post categories you may write. But they are customizable if you want to customize them. For example, if you have a Gloves product category…but a Gloves blog category, then by default they will be displayed as
- youronlinestore.com/category/gloves
- youronlinestore.com/product-category/gloves
Make sense? Awesome. Usually the defaults are cool, but if you want to customize it, then this is where you do it. I also generally choose the Product option under the Product permalink base, simply for aesthetics.
Now your online store setup is finalized. Feel free to navigate to the new Products link in the main WordPress Dashboard to create a sample product or category to see how the URLs look to you before going further.
Get a Compatible WordPress Theme
Before we get to General settings, you’ll want to make sure that your WordPress Theme is compatible and setup with WooCommerce.
As a WordPress refresher, Plugins control the functionality of your website. Themes control the design and “output” of your functionality – ie, what your visitor is going to see.
A plugin like WooCommerce adds a lot of functionality that some themes aren’t built to handle or output correctly (especially themes with a lot of built-in choices). It’s important to find a theme that doesn’t produce product pages that a garbled and ugly.
That said, you’ll also want a versatile theme that can be designed, updated, and in general just give you the website you want.

There’s a few options that I recommend.
First, you can get a WooThemes theme. They are premium (ie, not free), well-made, and (of course) sync perfectly with WooCommerce. This is the easiest (especially with the integrated support) but the priciest solution. Check out their selection here.
Second, you can use a WordPress default theme like Twenty-Twelve. These are free, well-made, and can be extended by installing a Child theme. Your installation probably already has one, but you can grab one via Themes -> Add New. This will be the cheapest option, but also one that requires some technical work to get the site you want.
Third, you can head over to a marketplace with high-quality standards like ThemeForest, and get a WooCommerce compatible premium theme. These are well-made, and a very easy solution, but be sure to define exactly what you’re looking for in a theme. Many oversell their features. But definitely go browse ThemeForest’s selection here. I also highlighted 25 of my favorites here.
Fourth, you can get a Theme Framework such as Genesis by StudioPress. It’s my preferred way of building sites. Genesis adds some critical theme functionality (like adding content to category pages), syncs across all sorts of plugins, and allows you to easily make design changes without impacting your whole site (especially with built-in Child Themes).
You can go read Genesis’ sales pitch here, but it’s the way to build a WordPress website in my experience. All the other options are awesome though – and WooThemes especially is a good fit if you want something that’s plug and play. Feel free to skip down.
If you go with Genesis, it takes a small addition to make it sync up with WooCommerce. Here’s how to sync it up.
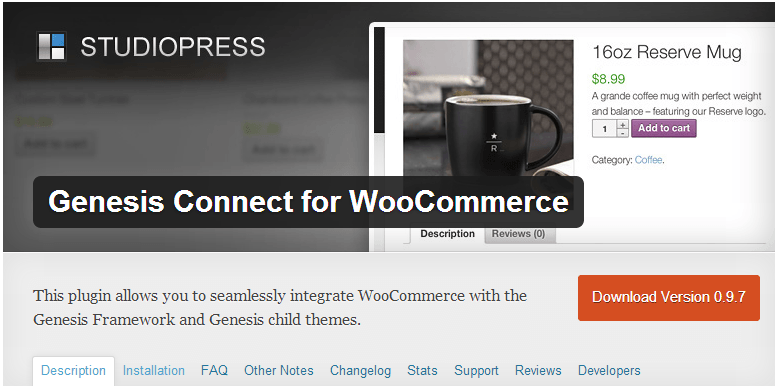
First, go get Genesis and install your first Child Theme (like Genesis Sample). Now, check out the screenshot below.
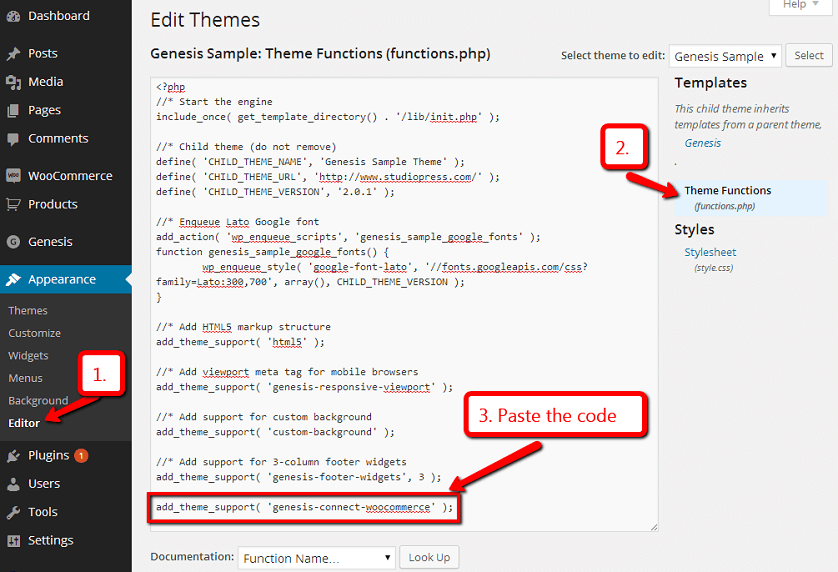
You’re going to do you’re first bit of PHP programming 🙂 Go to Appearance –> Editor –> In your Child Theme, Select Theme Functions –> Copy and paste the code below exactly (ie, no spaces or additions) into the functions.php file. Save.
[php]add_theme_support( ‘genesis-connect-woocommerce’ );[/php]
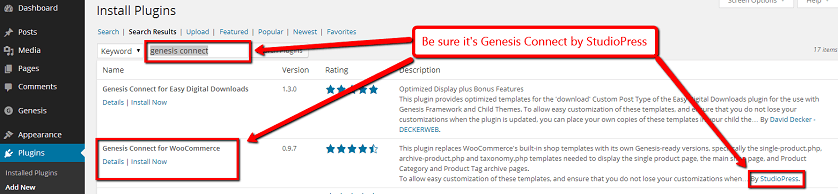
Now , head over to Add New Plugins. Search for Genesis Connect. Install and activate the one by StudioPress.
You’re done. Rock out with Genesis.
Whether you go with Genesis, WooThemes, a ThemeForest theme, default theme, or a different theme solution, just make sure to install and activate it to ensure that WooCommerce plays well with it, and it makes sense for your store and customers.
Now let’s dive into…General Settings.
General Store Settings
Under the WooCommerce link in the Dashboard menu, navigate to Settings and look at the General tab.
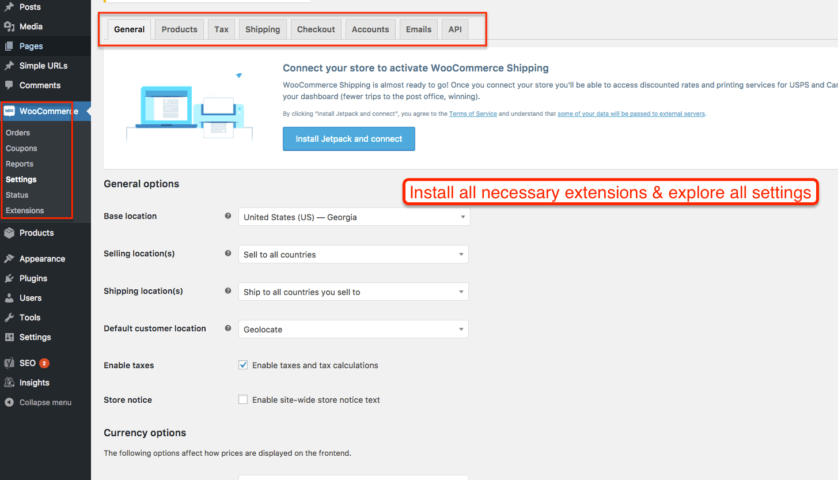
The first thing to note is all the default settings. You’ll have set up most in the wizard, but most are set by WooCommerce. They may or may not be right for your store. But either way, you’ll need to click through each section and subsection to check on them.
WooCommerce also has built-in styling for buttons, borders, and the like. If you want to get real control, you can customize these in your style.css theme file…or you can just match these to your website color scheme and everything will look great.
Also, WooCommerce allows you to enable Lightbox. It’s a piece of code that allows visitors to click on your product images and see them in a bigger, zoomable window without leaving the product page. Super-awesome.
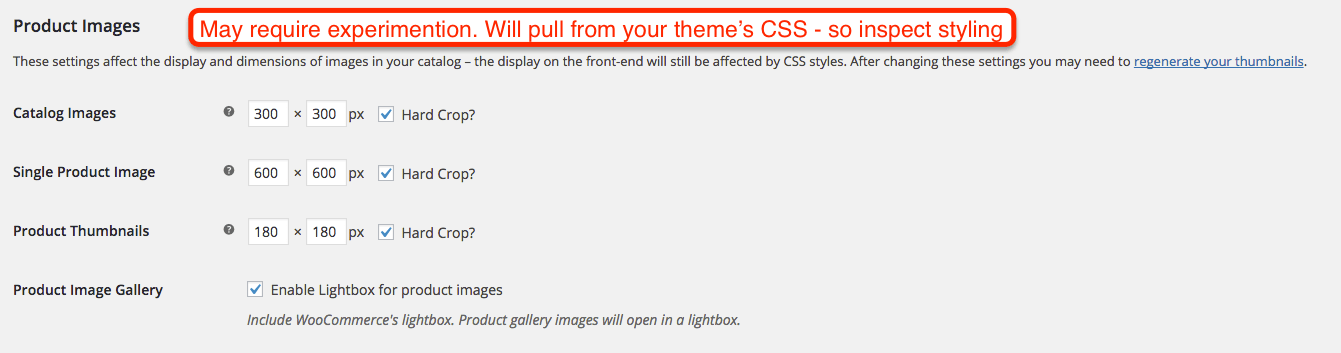
You’ll also need to double-check the Product Image settings. Look to see what size your product images are. Are they square? What do they scale down to? In this case, WooCommerce allows you to set Catalog Images (which appear in category pages), Single Product image (the featured image on the Product page), and Product Thumbnails (which appear below the featured image on Product pages).
The image setup can get a bit complicated, but WooCommerce has excellent documentation here which I’d read before uploading thousands of photos. But if the dimensions aren’t quite right, don’t fret since you can come to this same screen and regenerate your image dimensions.
Most of the rest of the Settings are fairly self-explanatory, or have excellent documentation. The main thing is to pay attention to detail, and take advantage of all the options that WooCommerce gives you. If you go with a platform solution, you often won’t have this many options available. And other self-hosted ecommerce solutions (like Magento) are nowhere near as user-friendly.
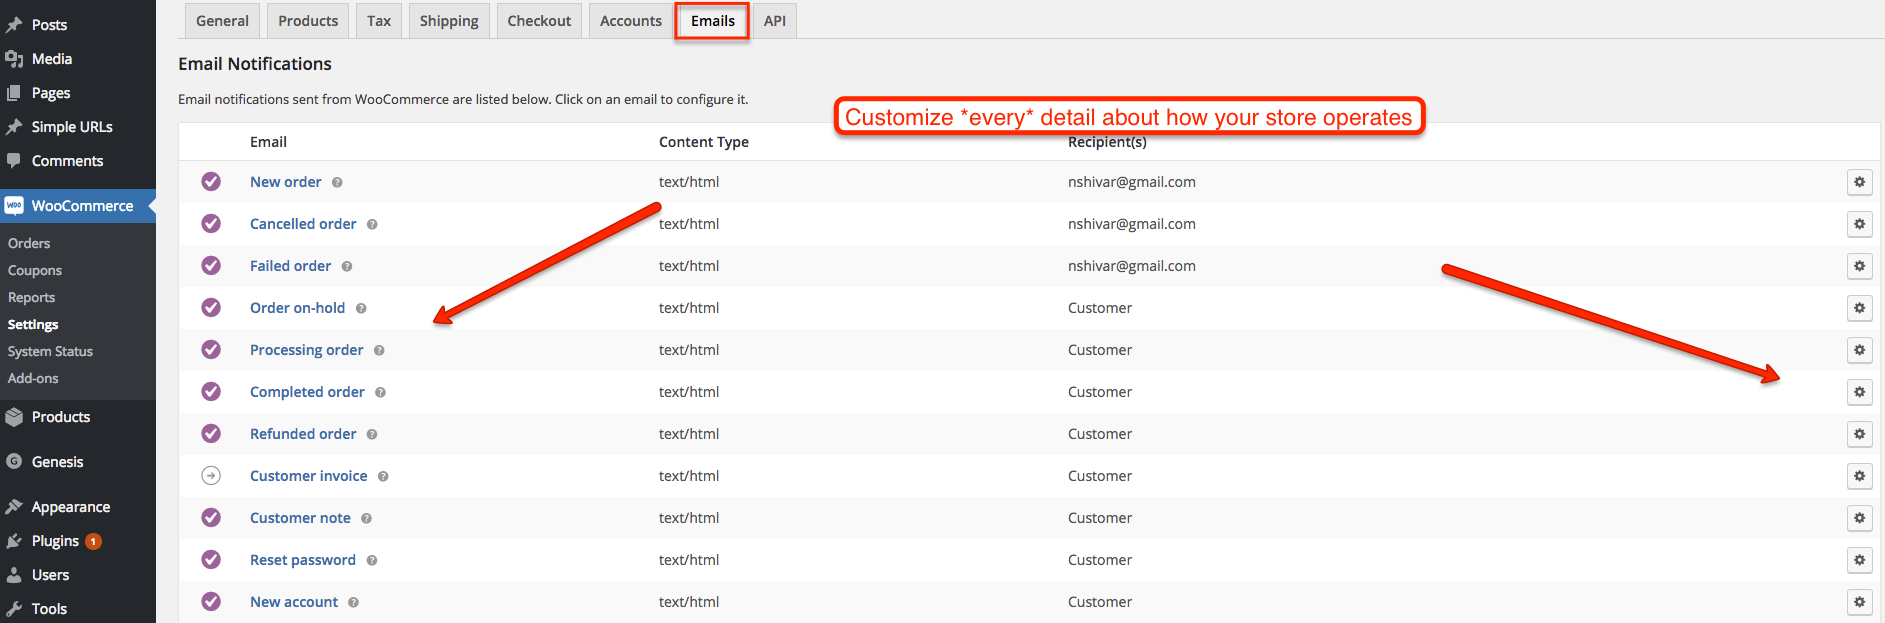
Walk through the settings and customize every aspect of the experience for your customer even what email they receive when they reset their password.
Outside of the General Settings, WooCommerce has a couple other tabs you should understand when initially setting up your online store.
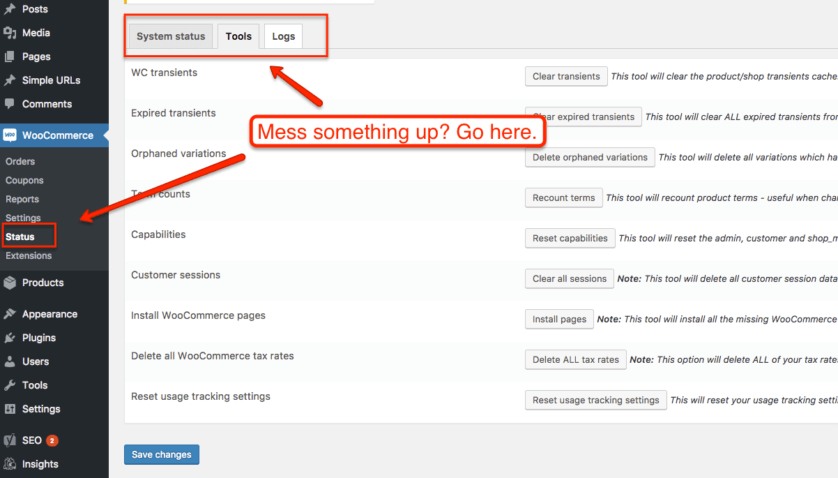
First is the System Status section. This is where you can get your technical information from memory allocated to version number.
Also, if you ever want to reset your entire store, you can head to the Tools tab. Hopefully you’ll never need it, but it’s good to know where it’s at either way.
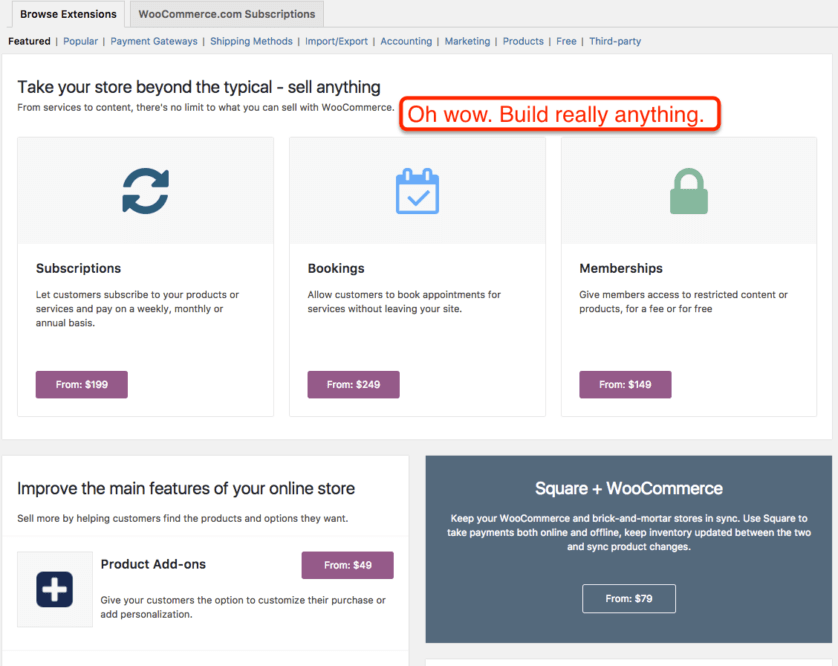
The second is WooCommerce Extensions. This section is where the magic can happen.
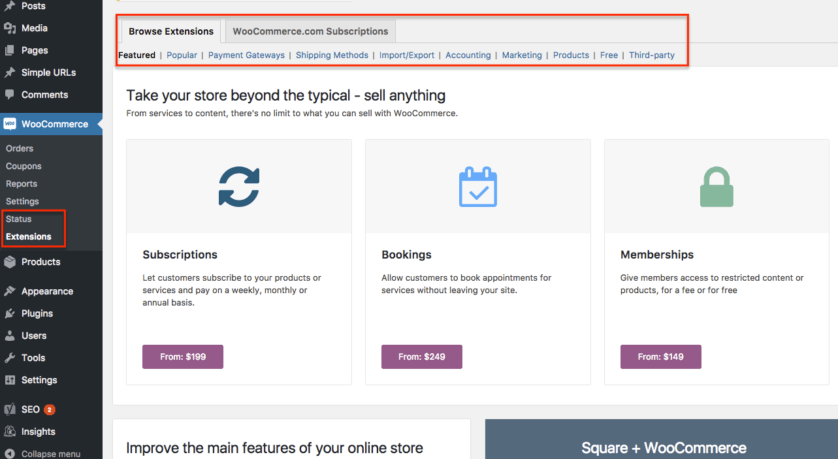
As I said in the Into to Options, one huge advantage of WooCommerce is the deep community of developers and apps they have that seamlessly work with the software.
Usually, when building an eCommerce store with specialized functionality (like syncing with QuickBooks or setting up a new payment gateway), you’d need to hire a developer to program a custom solution for a problem that honestly doesn’t need to be that custom. It’d cost hours and $$$ to develop.
With WooCommerce, you get access to a huge range of extensions that you just “plugin to the plugin” and make WooCommerce go further. Most all the extensions are paid, but they cost way less and start working much faster than a custom solution.
You should check out the WooCommerce Extensions marketplace here. They are easy to add on and this tab is where you head to manage them.
So now your WordPress ecommerce store is functional and set. Next is exploring what you need an online store for in the first place – your products.
Setup Product Pages
Your theme will provide the design, look, and feel of you product pages, but here’s how to understand all that goes into your product pages. Here’s an example product page with the default setup and a default Twenty Twelve theme.
It has all the basics needed, but is also highly customizable. And all the attributes are marked up with Schema, which helps with search engine optimization.
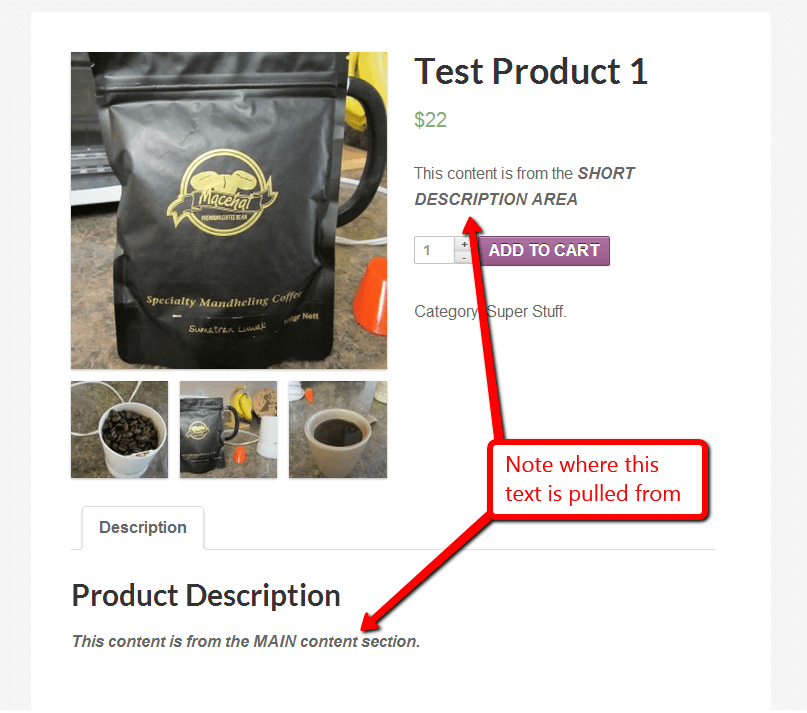
If you have any reviews, they will also appear below the product description
Below is a full capture of the backend in WordPress that generates that page. Note especially where the content gets pulled from (ie, Main Content vs. Short Description).
A few features to call out:
- Product Categories – self explanatory, but you can add them directly from the product page
- Product Tags – add additional categorization that doesn’t need to be a product (like colors, etc)
- Product Gallery – pictures that appear as thumbnails on the product page. As the customer clicks on them, they cycle to become the “big” featured image
- Product Image – set the main feature image

But the powerhouse of the product page is the Product Data widget. This is where you set your product type, price, shipping and more. But I’m serious when I call it a powerhouse. Once you figure it out, you can do all sorts of fun stuff here and sell nearly any type of product you can imagine.
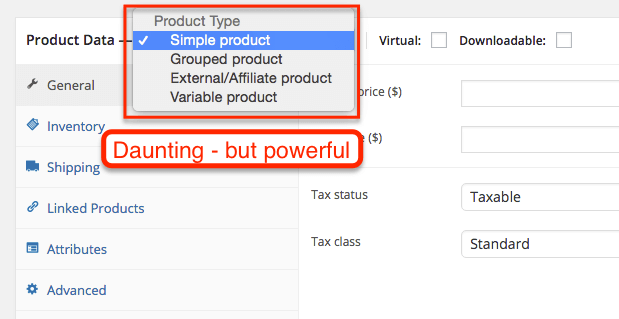
WooThemes has a ton of documentation on products here. But I want to highlight the most confusing aspect. A simple product is a product with no options, no changes, and isn’t a part of a collection. It’s just a single, simple product. Like a book or something.
Grouped products allow you to put a product as part of a collection. For example, you could post a dining set that would include the chairs, tables, etc in 1 grouped product…even though they would also be individual simple products as well.
Variable products allow you to add attributes to a product (ie, small, medium, large or blue, green, red) so that you can sell 1 product, but allow customers to choose the exact variation they want.
And External Products allow you to list and sell products off your site with your retail partners.
The Inventory and Shipping options are highly customizable as well.
As I mentioned, you can organize your products directly from the product page, but you can also organize them as a whole from the Products menu.
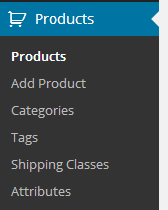
The category level pages also allow the creation of subcategory pages. Shipping classes, which I haven’t really touched on, are fairly self-explanatory but allow you to customize your shipping policies and rates based on distance, weight, bulk, etc.
Quick aside: If you are running a theme like Genesis that allows you to put content on your category pages, these can be a huge opportunity for your search engine optimization strategies.
Next Steps
If this guide seems daunting, and you think a hosted eCommerce platform would be a better fit, I’d recommend checking out Shopify (see my review of Shopify).
If you love the look of the control that WooCommerce gives you, and you think it’d be a good fit for your online store, then go follow this guide on setting up WordPress and then get started installing WooCommerce! And check out my complementary posts such as SEO for WordPress and how to bulk upload anything to WordPress (great for those thousands of products), and my list of WooCommerce themes.
If you want further video documentation – check out WooCommerce 101 here. Peace!