This WordPress tutorial covers exactly how to build a WordPress website from scratch for beginners.
Because here’s the problem: you are looking to start a WordPress website for your blog, business, portfolio, store, or forum – but the idea of messing with computer code, databases, or software sounds a bit daunting.
The good news is that setting up a WordPress website is straightforward (even if it’s not as “easy” as a social media account). While there is some learning curve, running it afterward is straightforward as well (see this guide to try it yourself). Unlike website builders, you own your site and it can grow as your site grows. Here’s how to set up a WordPress website in only 4 steps.
- Get A Domain Name – You will need something for people to type in their web browser to get to your website.
- Get Web Hosting – You’ll need somewhere for your new website to live.
- Install WordPress – Your website needs software better managed your website, and WordPress is the most popular and best option. You’ll learn exactly how to set up WordPress with just one 1-click.
- Next Steps – WordPress makes it easy to have a professional-looking website – and has the ability to become whatever you want it to be. You’ll learn exactly where and how to learn everything you’ll ever need to know about WordPress and doing WordPress website setup.
A domain name is simply what people type into their browser to get to your website (ie, larryludwig.com). A hosting account is simply a computer server where your website files live.
Here’s how to buy and set up both…
1. Get A Domain Name
Note – if you already own a domain name, you can skip down to Get Web Hosting.
I recommend purchasing your domain separately from your hosting provider if you want to save money over the long term and make things easier for yourself in the future.
Hosting and domain registration are two different activities – and usually, companies only do one well (and at a good price). When you purchase separately, you not only get better pricing & management, you also get the benefits of diversity and not having all your eggs in one basket so to speak.
On the flip side, hosting companies usually offer 1 year of domain registration for free. If you are trying to save money, and don’t foresee moving your site around, by all means, do it all in one place. I’ll cover that option as well in the guide.
Here’s where I’d recommend purchasing your domain name from:

My Rating: 9.0 out of 10
Free DNS: Yes
Free Domain Privacy: Yes
Namecheap Review
Want An Easier And Free Option?
Skip down to the next step! Many companies have a hosting package with a free domain for a year.
Go to your domain registrar (or recommended host below) and search for the name you want, and proceed through the checkout. You do not need any upsells. You can get everything you’ll need from your hosting provider.
Once you have your domain name, we need a hosting server to “point” it to.
(Note – you do not need to transfer the domain itself to your hosting company. I’ll show you how to “point” it).
2. Get Web Hosting
Choosing a good web hosting company is critical for your website.
There are hundreds of web hosting companies available. But which one is best?
Here’s what I recommend for someone just starting.

Larry's Take
| Price | $2.95 - $13.95 per month |
|---|---|
| Annual Discount | Yes |
| Promotion | Starting At $2.95/mo |
Bluehost has been around since 2003, and host over 2 million websites. Bluehost is recommended by WordPress.org.
I’ve also worked with Bluehost to help make it easy for you to create a blog. Check out my free bonuses you get signing up with my link.
Bluehost offers these features:
- FREE Domain Name
- FREE SSL Certificate (otherwise known as https://)
- 24/7 Support
- 30-day money-back guarantee
Bluehost Plans
| Plan | Basic | Plus | Choice Plus | Pro |
|---|---|---|---|---|
| Initial Price* | $2.95/mo. | $5.45/mo. | $5.45/mo. | $13.95/mo. |
| Renewal Price | $10.99/mo. | $14.99/mo. | $19.99/mo. | $28.99/mo. |
| Websites | 1 | unlimited | unlimited | unlimited |
| Storage | 10 GB | 20 GB | 40 GB | 100 GB |
| Bandwidth/month | unmetered | unmetered | unmetered | unmetered |
| Free Domain Name | 1 year | 1 year | 1 year | 1 year |
| Free SSL | ||||
| CDN | ||||
| Dedicated IP | ||||
| Daily Backups |
Step 1. Choose the hosting plan that fits your current goals.
First, most all hosting plans are set up as 3 tiers. The low tier usually has some sort of cap and the high tier has some sort of bonus. Consider value for yourself rather than overall value. Unless you run a photo or travel blog, you likely won’t need a ton of storage.
Same with plans for multiple websites. Hosting multiple websites on one account is a real value compared to website builders…but there’s no reason to over-purchase. You can read further in my Web Hosting Explained post. Note below how InMotion’s plans are structured. All are of great value… but only if you need what is listed.
Second, note again that WordPress only needs shared Linux hosting to run. You don’t necessarily need “WordPress hosting” – in fact, some companies just one product – shared web hosting – and just refer to it differently depending on the focus of the sales page.
Whatever your goals or resources, I do recommend going ahead and getting started. Usually, it’s hard to know *exactly* what you need until you’ve done it yourself.
Every hosting provider has a long money-back guarantee (Bluehost is 30 days), and all of them make it fairly easy to upgrade or downgrade.
Step 2. Purchase your plan & select your hosting options.
The guide will use screenshots from Bluehost due to their broad appeal, pricing, and recent purchase flow & setup wizard redesign that makes WordPress setup even more straightforward than usual.
They assume you’ll be running WordPress unless you decline it.
Bluehost uses the industry-standard cPanel for hosting account management and will auto-install WordPress.
Visit this link to get started with Bluehost’s current discount

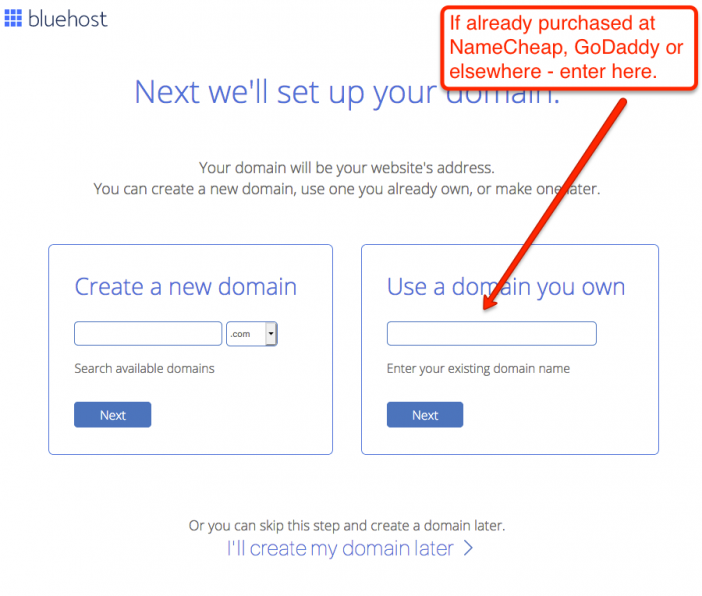
Next, you’ll need to either search for a new domain, use a domain that you’ve already registered, or create a new domain later and use a temporary address.
Choose the one that makes sense for you. Bluehost does offer a free domain for a year before renewing at retail. Otherwise, type in the domain that you purchased earlier into the box.
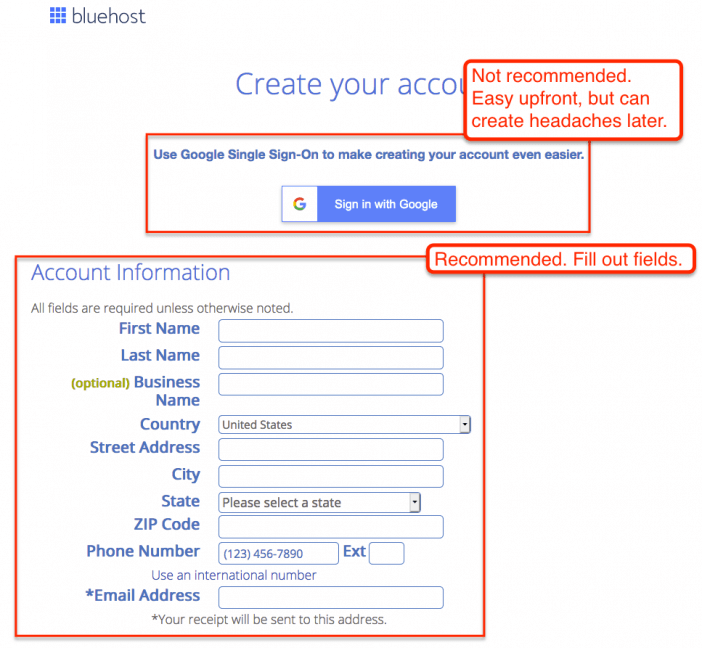
Then, you’ll create your Bluehost billing account. You can use your Google account for convenience. However, if you ever need to hire a consultant or friend or simply change your Google information…it can create headaches. I recommend creating a regular account from scratch.
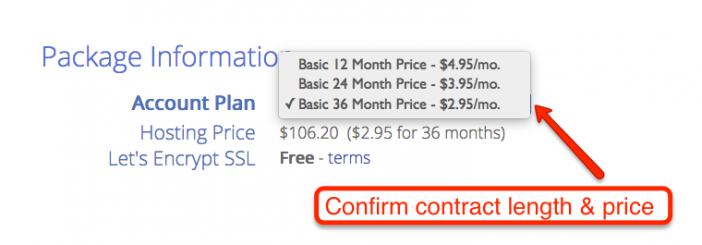
Next, you’ll choose your package length. The longer that you commit, the better your monthly pricing.
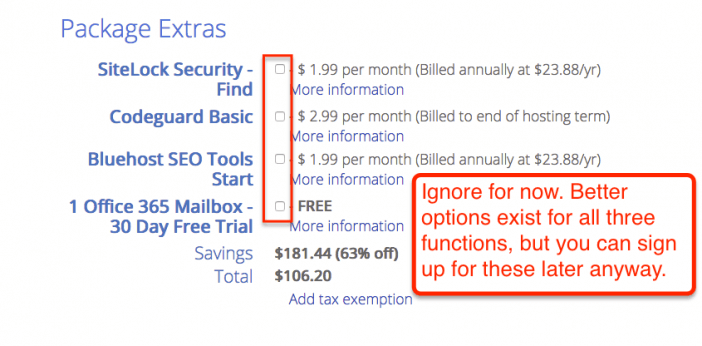
Neither Bluehost nor InMotion or SiteGround do a ton of upsells. But they do offer a few. The deals are usually alright, but they aren’t necessary. In fact, you can get the same deals later or find a better option after setting up your website. I recommend unchecking all of them.
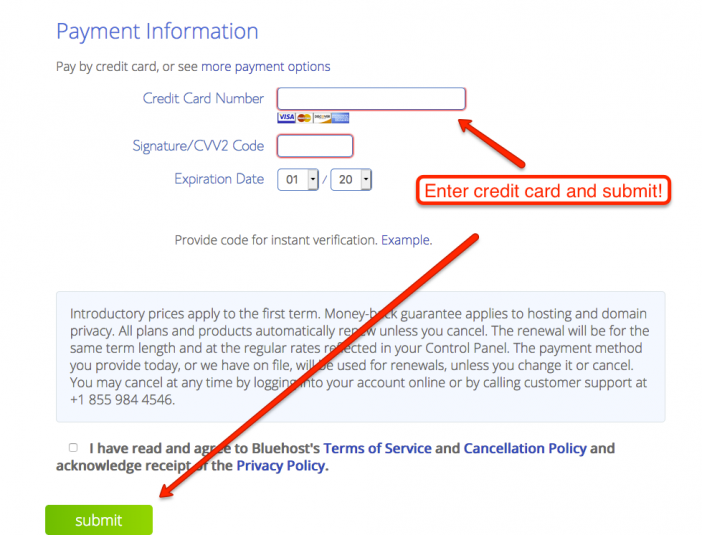
Finally, you’ll type in your credit card and agree to the terms of service and purchase.
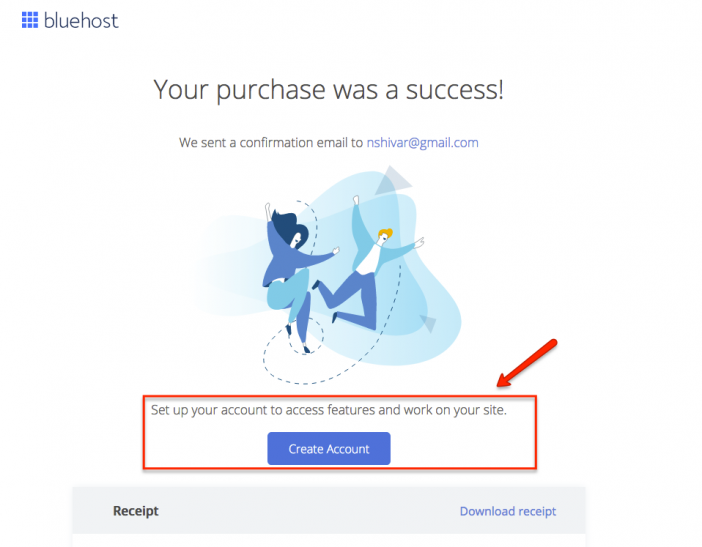
Success! Now you can create your Bluehost hosting account.
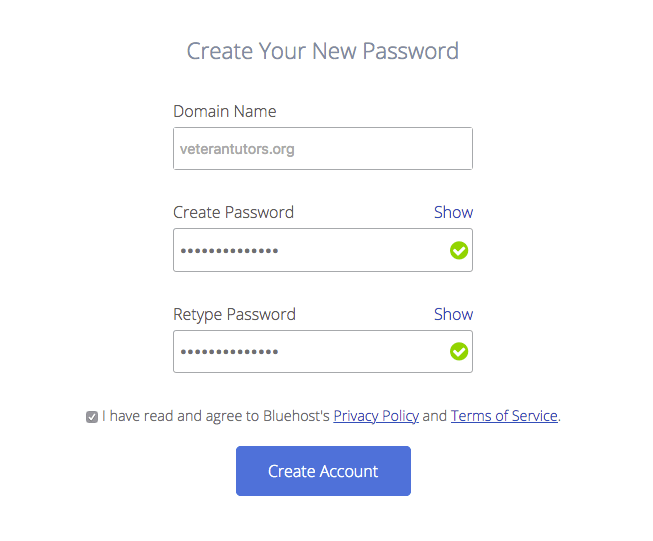
Step 3. Access your account & technical details.
Your Bluehost hosting account will be different from your billing account. Your primary domain name will be your username, and you’ll need to create a password. Be sure to make it strong. If any hacker tries to get a password – it’ll be this one.
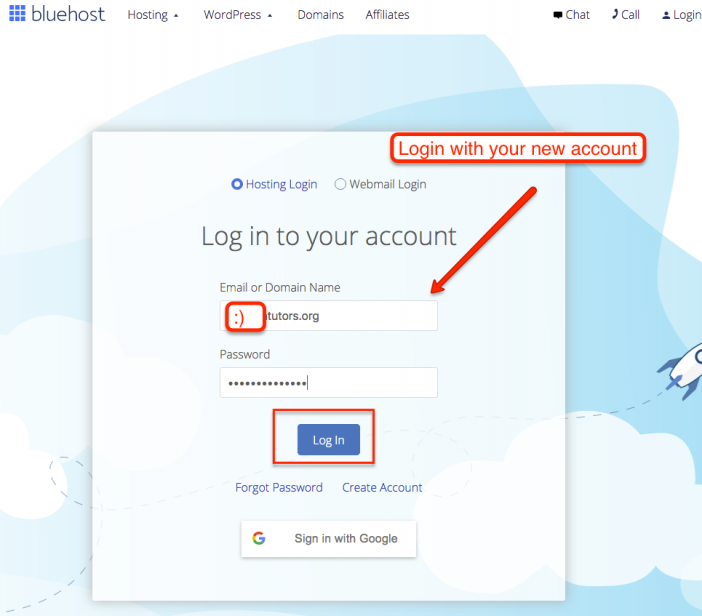
Take that username and password to login.
Ok – now the screen requires a bit of background.
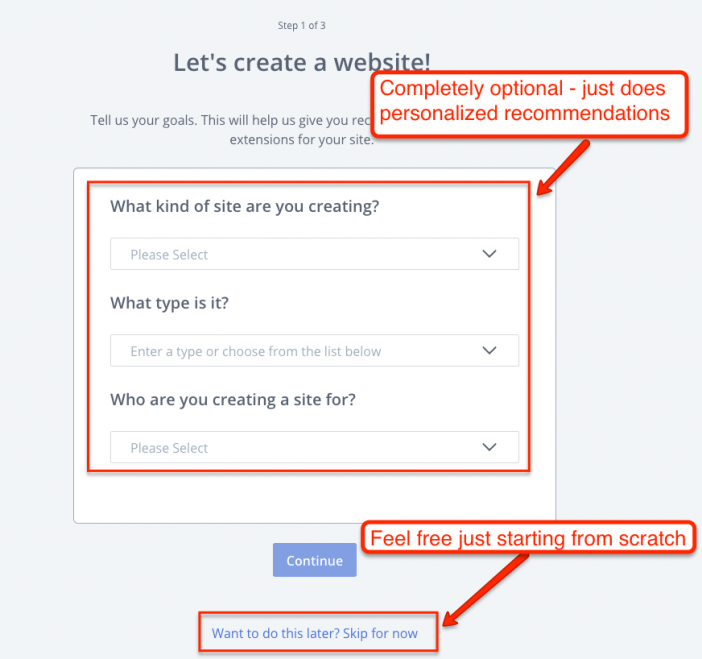
First, Bluehost is assuming that you’ll want WordPress. An automatic WordPress installation can be customized to save some setup time. That’s what this screen is for. It’s totally optional.
Second, you can add functionality to WordPress with “plugins” and add design layouts with a WordPress theme. Bluehost uses your answers to install plugins & themes popular with most customers.
Third, like 3rd party software, it’s actually simpler & provides more options to add a WordPress plugin & WordPress theme after you install & set up your site.
So, feel free to fill out the questionnaire, but also feel free to skip for now. You can undo any mistakes easily later no matter what route you take.
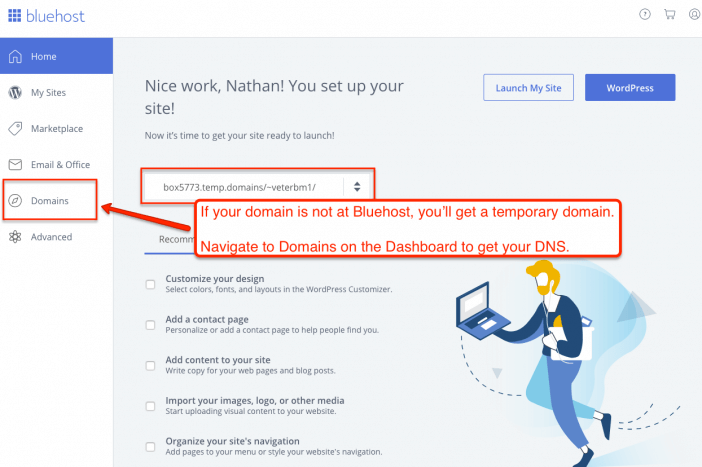
After this screen, you’ll land on your Bluehost hosting dashboard. If you bought your domain with them, then you can skip to down to Install & Configure WordPress.
If you bought your domain at a 3rd party, then we’ll move to Step 4 to connect your domain with your website.
Step 4. Add Nameservers to your domain name & confirm the connection.
Before you do anything else, head over to the Domains section of your Dashboard.
Then, go to Manage –> DNS. You do not need to transfer your domain registration to Bluehost. Remember, the whole point of registering your domain elsewhere is so that if something were to happen, you can quickly move your website somewhere else.
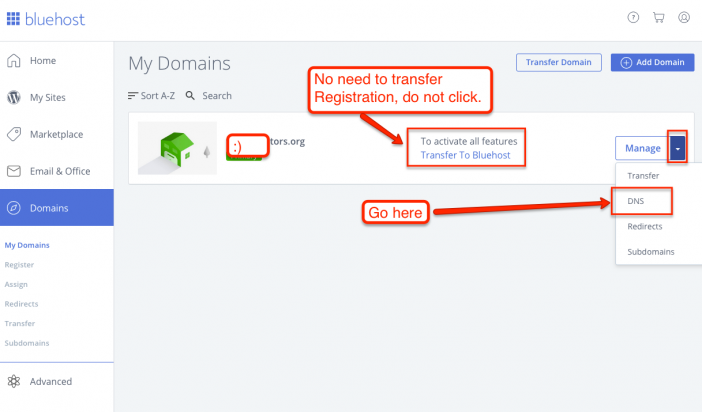
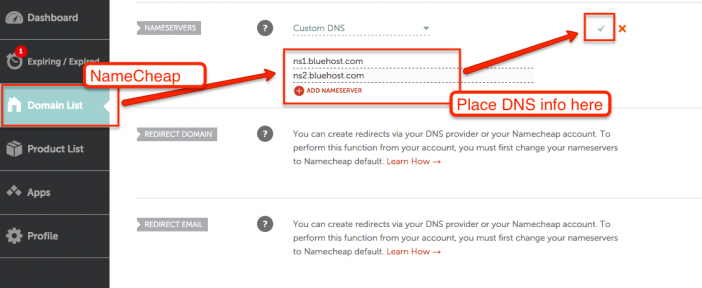
Next, copy Bluehost’s name servers. They should be ns1.bluehost.com and ns2.bluehost.com – then take them to your registrar.
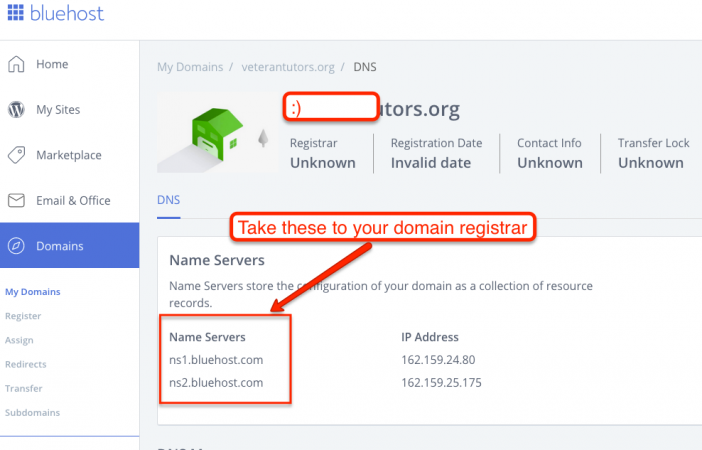
At your registrar, paste those name servers into the DNS nameserver fields and save. Here’s what it looks like at Namecheap.
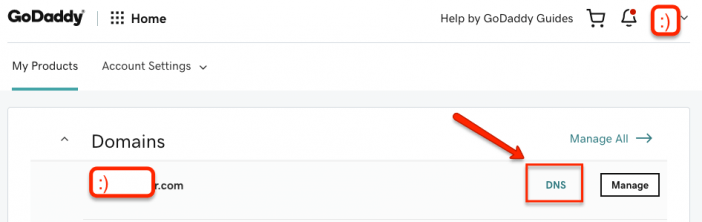
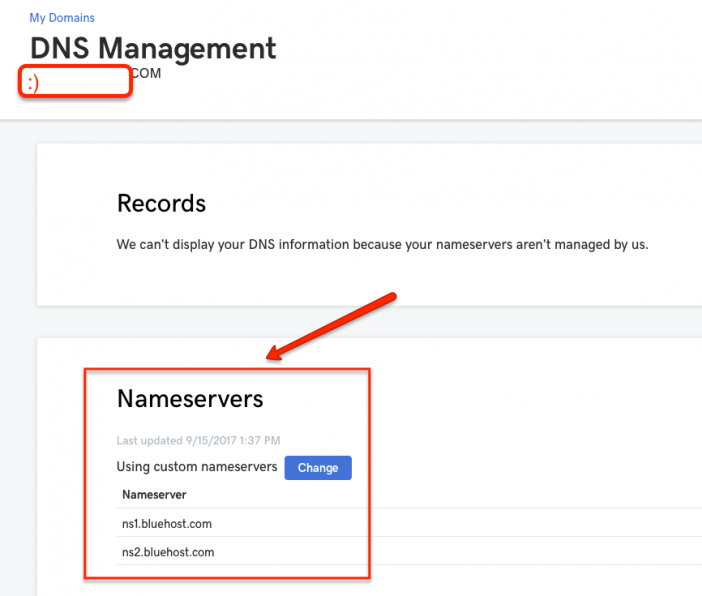
And here’s what it looks like at GoDaddy.
It may take a couple of minutes for your DNS records to “propagate” throughout the Internet. But once they do, anytime someone types in your domain name, they’ll get routed to your website on your hosting account.
3. Install WordPress
Fortunately, this is the easy part. To get WordPress installed, configured with the right theme and plugins can be confusing for a first-time blogger.
If you purchase through my link, all of this will be done for you automatically. You’ll be ready to rock and roll. Included free is my course teaching you the basics of WordPress.
You’ll get this all free, only if you use my link.
4. Next Steps
Congrats!
If you made it to the end, you are one of the selected few. You have completed the first step in a journey that can be life-changing for you.
You can continue by:
- Join my Facebook Group (Your First $1k Blogging) — Talk to me and other experts about blogging.
- Take my SEO for Writers course — You need to be found in Google my course can help you with that.
- Find out how to make money blogging.